Getting started
A walkthrough of getting up to speed with using the iOS SDK
Installing the SDK
This walkthrough already assumes that you have installed the SDK and already have a registered organisation in the CMS, if this is not the case please visit http://proxitee.com/developers/ which has a guide for performing these actions.
Required iBeacon settings
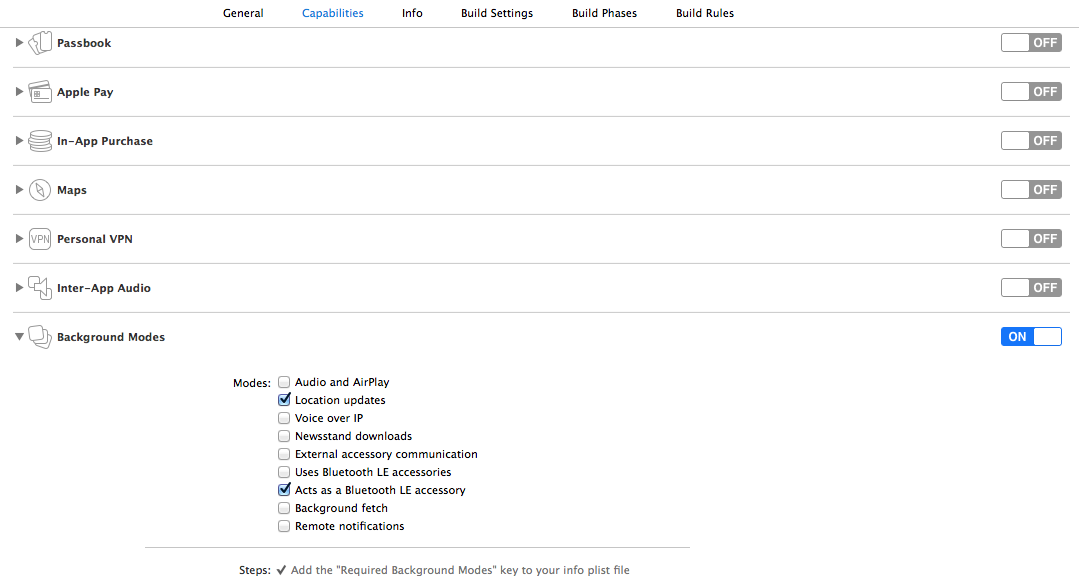
If you want to use iBeacons there are some standard settings that must be setup, firstly you must enable Background Modes under the Capabilities tab and enable both Location Updates and Acts as a Bluetooth LE accessory:

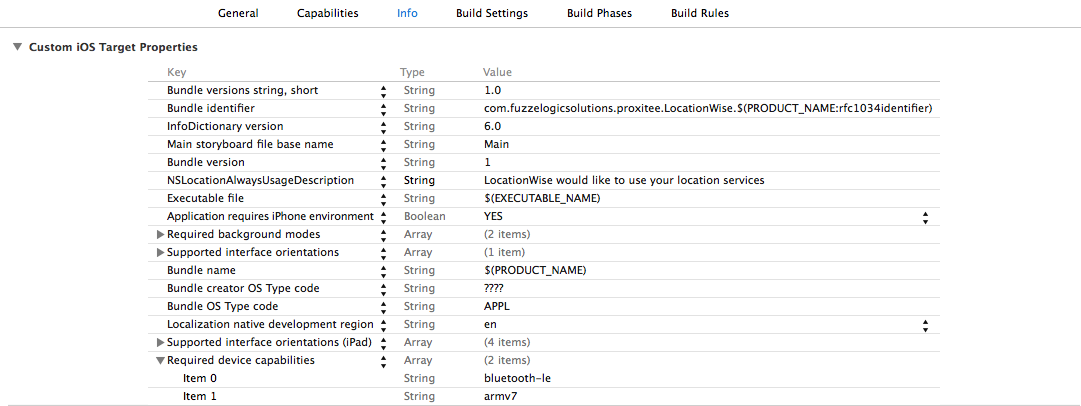
You also need to Add a setting under the Info tab:

Under Required device capabilities make sure bluetooth-le is added.
iOS 8 and above
Starting from iOS 8 Location Services has changed and now requires that a new setting be added to the Info settings, for further information visit http://nevan.net/2014/09/core-location-manager-changes-in-ios-8/
Required proxitee settings
In order to provide the necessary config for proxitee you must create a Proxitee.plist file in your project, this file should have this format:
<?xml version="1.0" encoding="UTF-8"?>
<!DOCTYPE plist PUBLIC "-//Apple//DTD PLIST 1.0//EN" "http://www.apple.com/DTDs/PropertyList-1.0.dtd">
<plist version="1.0">
<dict>
	<key>apiUrl</key>
	<string>http://beta-api.proxitee.com/v1/</string>
	<key>apiKey</key>
	<string>b35e23d774f86a03</string>
</dict>
</plist>
You will need to replace the apiKey with the API key issued when registering on the CMS and can be located on the Organisation screen.
API URL
This will be replaced depending on which environment you will be running against at present there is only a beta API available however there will also be a production API that will use https://api.proxitee.com/v1/
Now for some code
All of the API interaction happens through the PXTProxitee class and acts as a facade for each of the tasks that can be carried out.
The first task is to setup the API this is typically done in the App Delegate for the application, in here you will first need to import PXTProxitee.h then perform the following:
-(instancetype)init
{
    [PXTProxitee setup];
    return [super init];
}
Now we can start responding to beacons by adding the following:
- (BOOL)application:(UIApplication *)application didFinishLaunchingWithOptions:(NSDictionary *)launchOptions {
  	// in this example we only use beacons
    [[PXTProxitee shared].beacons start];
    return YES;
}

- (void)applicationWillTerminate:(UIApplication *)application {
    [[PXTProxitee shared].beacons stop];
}
At the moment the app will not do a lot as we have no custom actions registered and no notifications we are observing for.
Next we will listen for a notification of when beacons are received then we can see if there being captured by proxitee.
CMS Setup
In order for the beacons to be received they will need to be already setup inside the CMS, for more details on using the CMS please visit http://proxitee-cms.readme.io/
Notifications can be managed using [PXTProxitee shared].notifications and use a subclass of NSNotificationCenter so the API should already be familiar:
-(void)receivedBeacons:(NSNotification *)notification {
		NSArray *beacons = [notification.userInfo objectForKey:@"beacons"];
  	NSLog(@"received beacons: %@", beacons);
}

-(void)dealloc
{
    [[PXTProxitee shared].notifications removeObserver:self];
}

// add this inside of didFinishLaunchingWithOptions
[[PXTProxitee shared].notifications addObserver:self selector:@selector(receivedBeacons:) name:kPXTBeaconManagerDidReceiveBeaconsNotification object:nil];
That's it for this walkthrough you should now have your app being able to respond to beacons setup in the proxitee CMS, go ahead and add a local notification action and assign it to one of your beacons, you should see the notification when the app is either in the background or closed.
Updated less than a minute ago
